Did you know that you can digitize and use any resource in Seesaw for distance learning? If you have a ton of PDF resources on your computer that you think you can’t use for distance learning, think again! You can 100% use them. Read on to learn how to use resources in Seesaw!
A note about this blog post:
I’m not endorsed or sponsored by Seesaw. This blog post is 100% the result of my opinion and experience with Seesaw.
Examples of Resources used in Seesaw
Before you think, “Lauren, I can’t learn one more thing right now!”
I get it. I do. Distance teaching has been a huge learning curve for teachers and students.
But I would be spending my time showing you how to use this software/app if I didn’t think it would make Distance Learning better for you and your students.
Just look at some examples of resources used in Seesaw! They’re interactive, they can include audio (from teachers and students). I really believe you and your students will love them!
Are you ready to keep scrolling to read about how to use any resource in Seesaw?! 😉
How to Use Resources in Seesaw
So what do I mean by “any resource”? I’m talking about those PDF downloads that you have saved to your computer or have previously purchased on TpT!
This can be a document that you have scanned to your computer from a physical resource or book in your classroom and saved as a PDF.
I know that so many teachers were nervous about distance learning and sad thinking of all of their great resources sitting on a shelf or their computer, not being able to be used.
Thankfully, that is false! These can be used digitally. Today, I’m going to show you just how to use resources in Seesaw!
(If you are using Google Classroom™️, you can check out this tutorial for using any PDF resource in Google!)
DISCLAIMER: While many TpT authors do not mind if you do this, I cannot speak to every TpT author’s terms of use. You absolutely have my permission to do this with any of my resources. However, you should always check with the teacher author before doing this. Also, make sure you only use these resources for your own class/students.
CONSIDER THIS BEFORE CONVERTING A RESOURCE FOR SEESAW
Before you get started converting a resource to use in Seesaw, think about what the main purpose and goal of the resource is.
A great function in Seesaw is the ability of students to trace, write, and color over the resource.
This allows you to use resources in Seesaw for handwriting and creative purposes. Although it is often more difficult for students to write and color neatly in a digital format, it can be done.
If the main goal of a resource is fine motor practice, such as cutting and pasting, there are definite limitations for doing this digitally with Seesaw. The students won’t be able to cut and paste pieces of the page digitally.
However, a great feature in Seesaw is the ability of students to take a picture of their physical work and upload it. Therefore, if your main goal is handwriting or fine motor practice, you can ask them to take a picture of their work. A handwritten journal entry, fine motor activity, or something similar would work.
All in all, if the main purpose of the activity is to read, apply critical thinking skills, solve math problems, write creatively, etc., you can easily digitize for Seesaw! And I firmly believe that you will be so glad you did!
What is Seesaw?
Seesaw is a platform that focuses on student engagement and empowering students to show their learning in a variety of ways.
Students use a variety of digital tools to create, think, collaborate, and communicate. Student work is stored neatly in one place. It can be shared with teachers and families.
All student work must be approved by the teacher. This makes it simple for teachers to communicate and give feedback.
Why I love Seesaw
Seesaw allows educators and students to easily communicate via voice recordings. You can record yourself giving directions for each assignment. You can even ask that students complete the assignment by sending it back with a voice recording. As a reading teacher, this is a BIG plus. 😍
Seesaw – What the Student Can See, Hear, Do, and Record
To prove to you how worth it actually is to learn another software, I filmed this activity from the “student perspective.” Take one minute to see how cool this is for teachers and students alike.
Is Seesaw Free?
The core Seesaw services are FREE.
There are also premium, paid versions of Seesaw, such as Seesaw Plus and Seesaw for Schools. You can learn more about it by clicking here.
Steps for Converting any PDF Resource for Seesaw
Below, I am giving you easy step-by-step directions for how to use resources in Seesaw. Once you are familiar with this process, it will be a breeze!
It just takes a couple of minutes to do this and I think you’ll be amazed at how easy it is. The possibilities for using resources that you already have in different ways are endless!
While this may look like a lot of steps, have no fear! This is simply because I really break it down for you.
To prove it to you – here’s a video of me “preparing” this resource for Seesaw. I follow the same steps as I outline below. See for yourself (hahaha, I love puns!!) how easy it is to put your resources in Seesaw!
Once you get going, it won’t take you long at all. Teacher’s promise! It is totally worth it if it means you and your students can access and use your favorite resources in Seesaw, too!
Step 1: Find/Open the PDF of the Resource
Locate the PDF in your files and open it in a PDF reader.
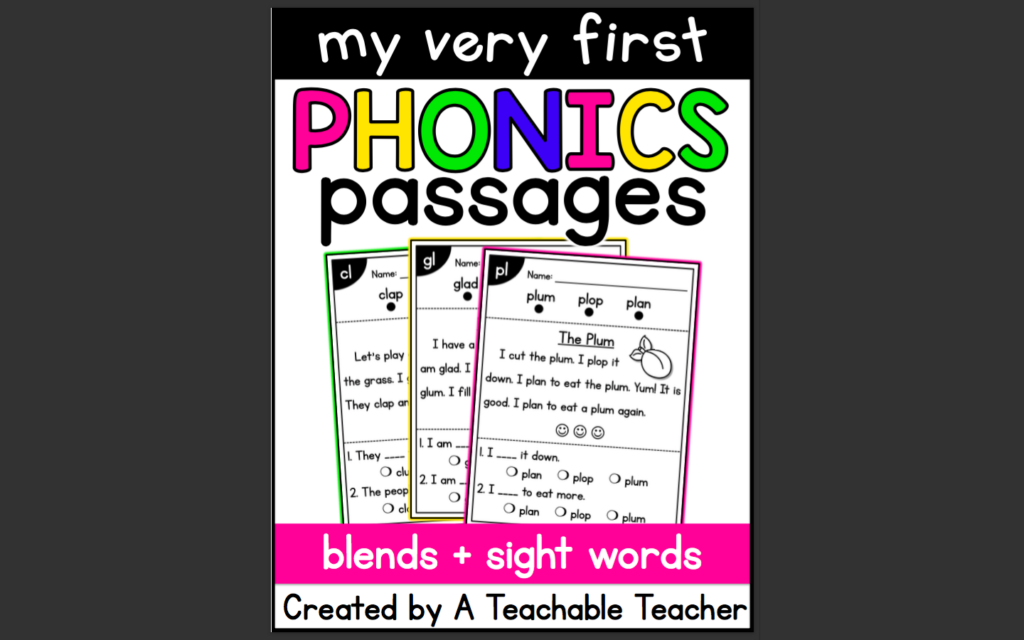
(Remember, you can always scan physical resources to your computer, save them as a PDF, and use those as well.)
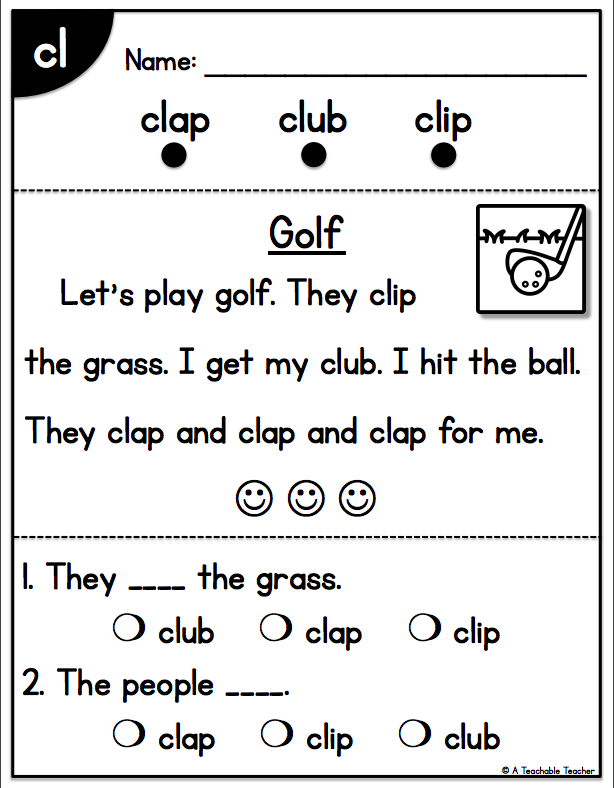
For this example, I’m going to use My First Phonics Passages. The best part of this is you can use any resource that you and your students know and love. Thank goodness for something familiar to keep those procedures streamlined!
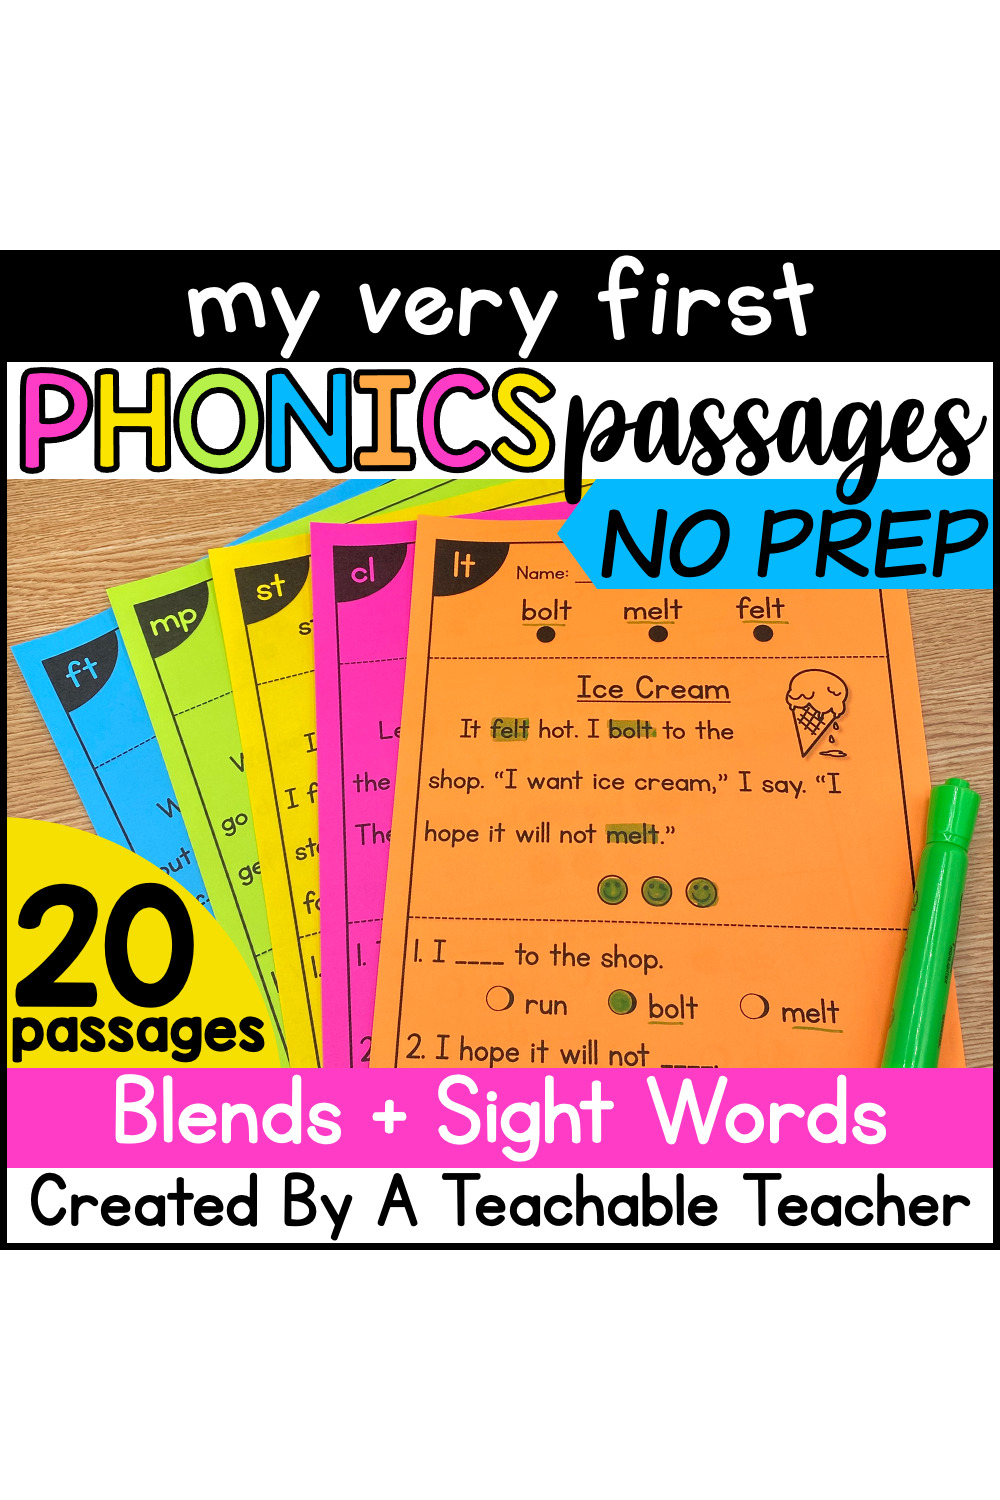
My Very First Phonics Passages – Blends and Sight Words
Step 2: Take a Screenshot
When taking your screenshot, you want to ensure that the page fills your screen so you can see the page in its entirety.
💡Tip: Don’t zoom all the way out. The bigger the page, the crisper the image will be.
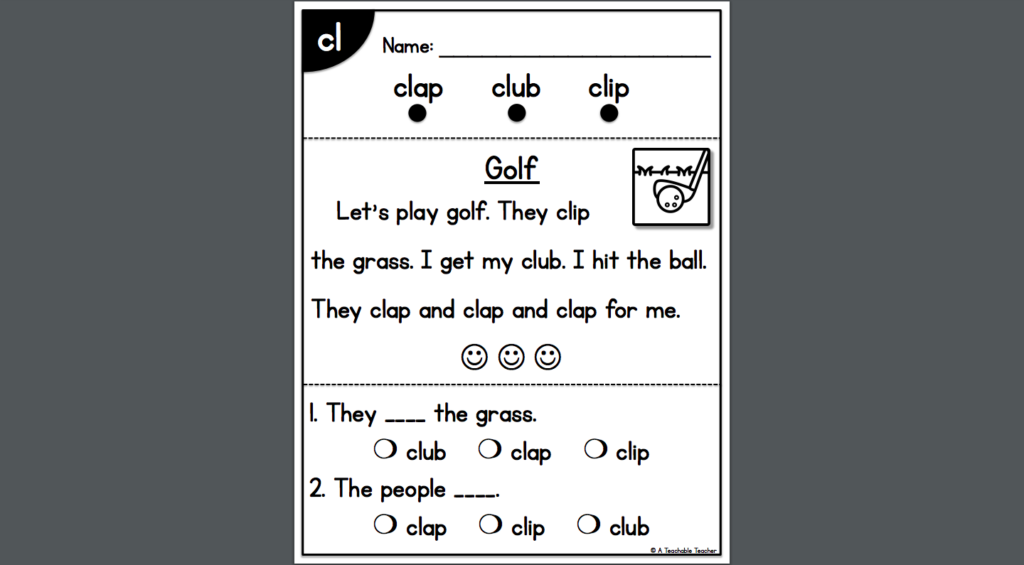
The goal of this step is to get a clear image of the page that you would like to use.
If your screenshot creates an image of your entire screen, simply crop it to only include the resource page.
Taking a Screenshot on a Mac
I use COMMAND + SHIFT + 4. This allows me to take a screenshot of a specific area.
I drag my new + cursor (that appears after pressing those keys) from the top left of the page to the bottom right of the page. The screenshot is automatically saved to my desktop.
Taking a screenshot on a pc
On a PC, you’re going to press the WINDOWS key + S to “search.” Then type “snipping tool” and it should pop right up!
I don’t have a PC, but my bestie does! Click HERE to watch a video my friend Tara created on how to use the Snipping Tool.
Step 3: Open Seesaw
Make sure you have an Internet connection and are signed into your Seesaw teacher account.
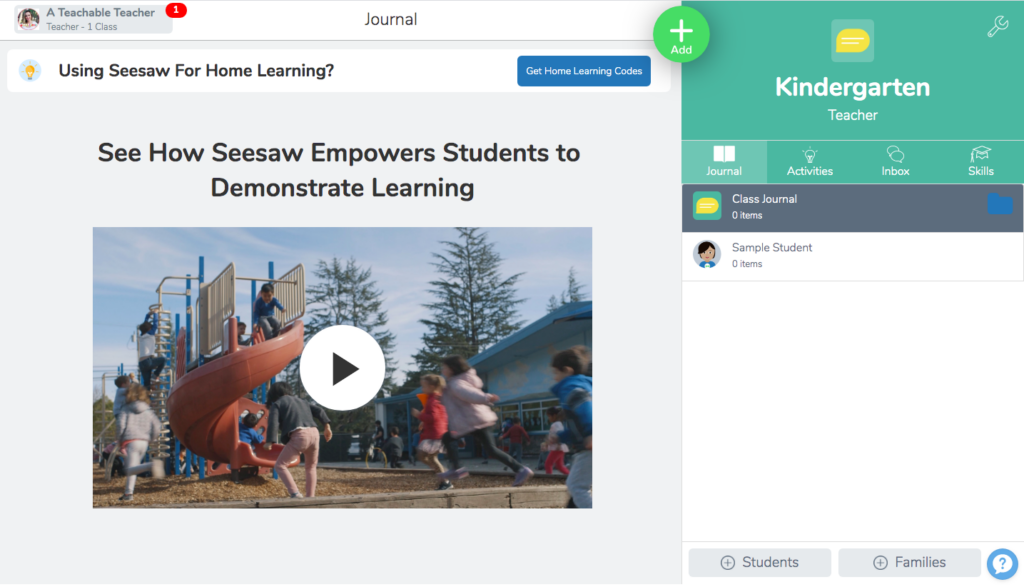
Step 4: Create the Activity
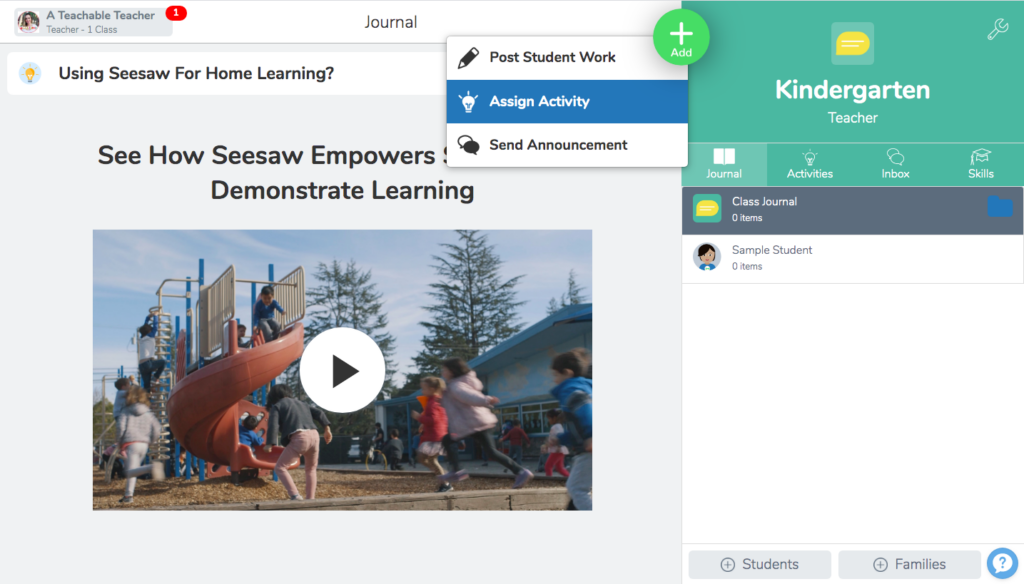
Click the green “Add+” button.
Click “Assign Activity.”
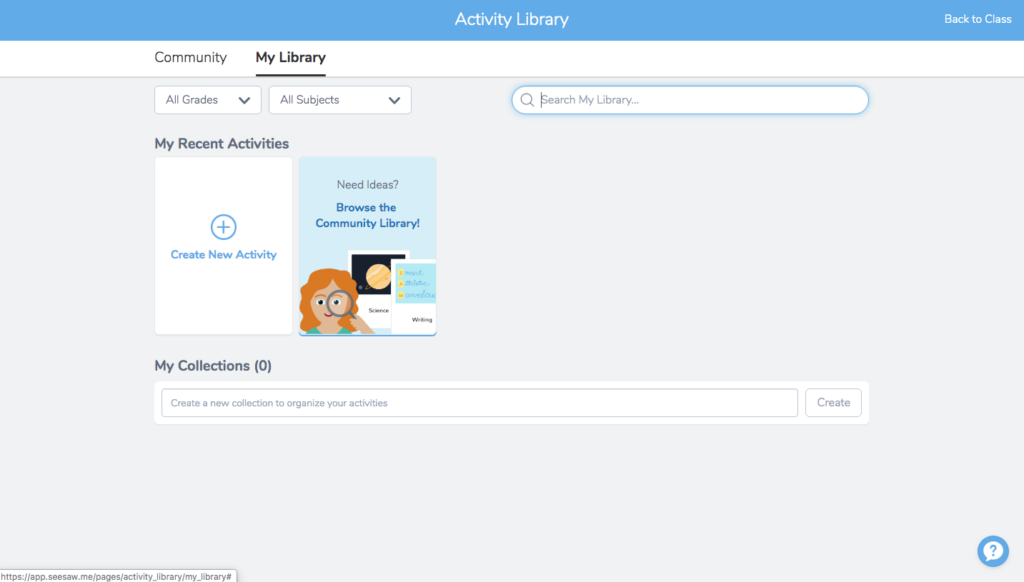
In the activity library, click “create new activity.”
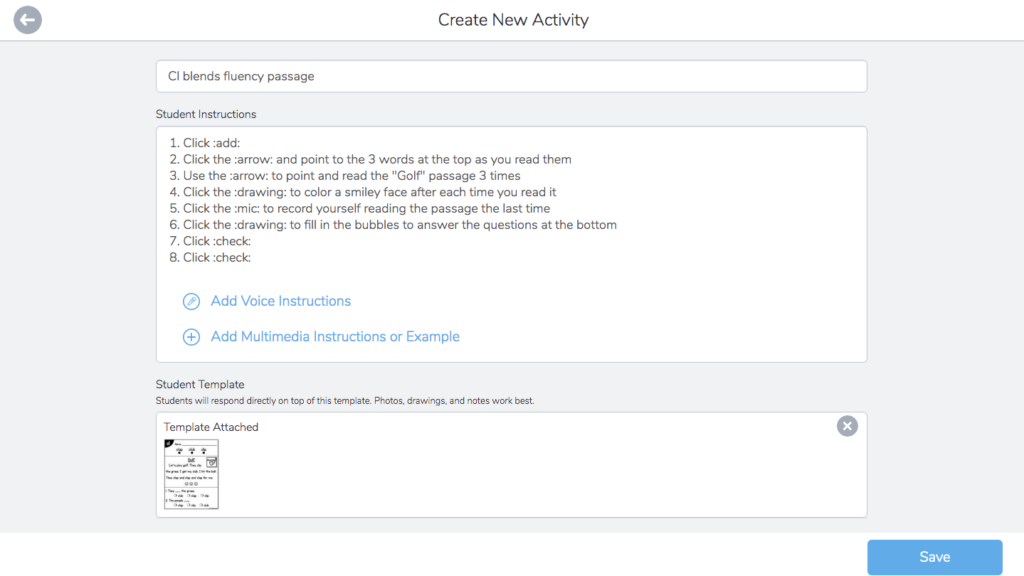
Step 5: Add Student Instructions
Click under “Activity Name” and type the activity name.
Click under “Student instructions” and type the student instructions.
💡Tip: When adding student instructions, use the Seesaw shortcuts to create Seesaw icons in your instructions. Check out the list of shortcuts here.
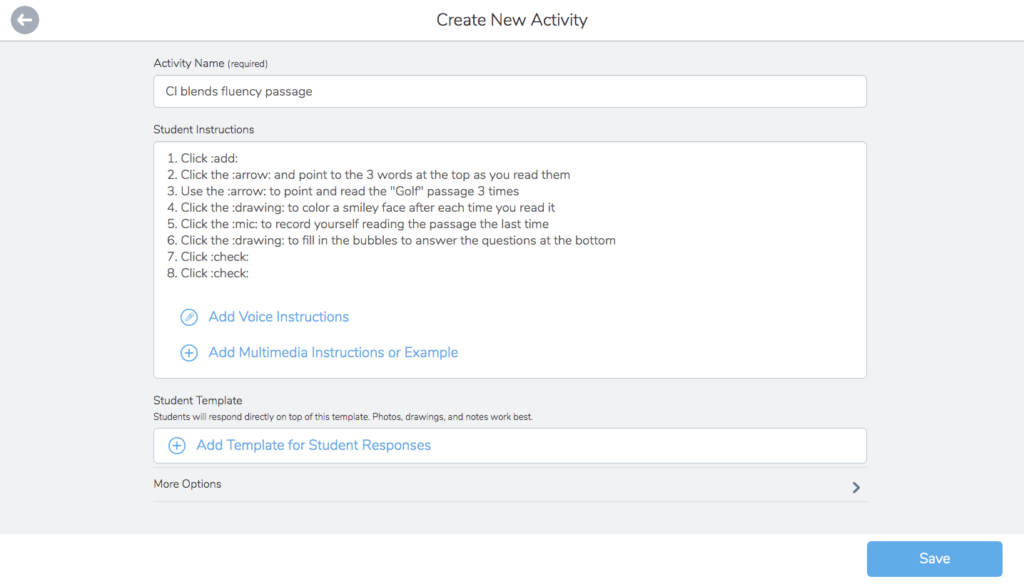
Here’s one of the reasons that I love Seesaw. You can also click “Add voice instructions” to record yourself reading the instructions to the students. How awesome is that?
But wait, it gets even better!
Students EASILY can record themselves reading the passage and send it back to you. This is a distance-learning-reading-teacher’s dream! 😍
If you would like to upload an example or visual instructions, click “Add Multimedia Instructions or Example.”
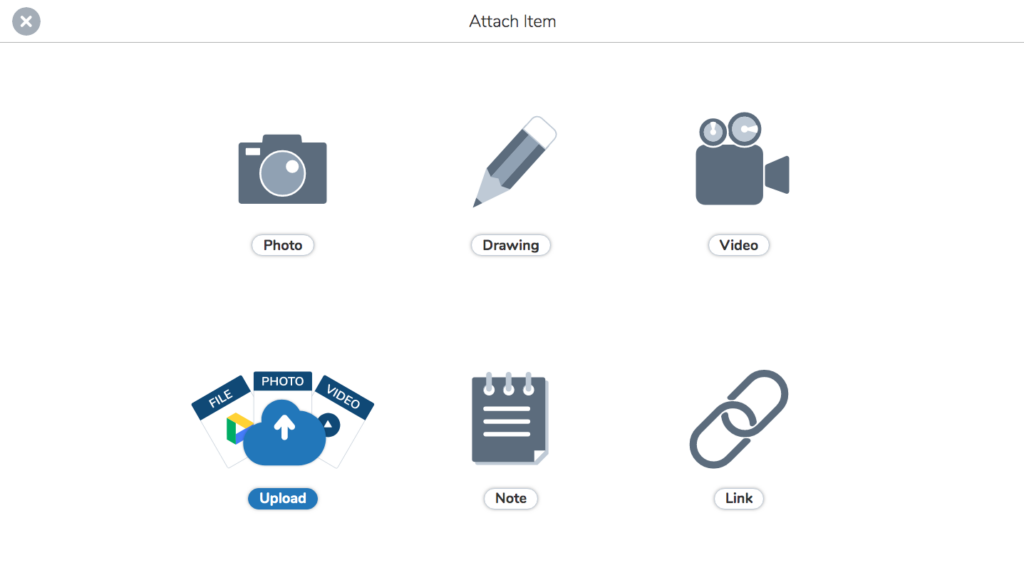
Step 6: Add the Resource PDF
Click “Add Template for Student Responses.”
Click “Upload.”
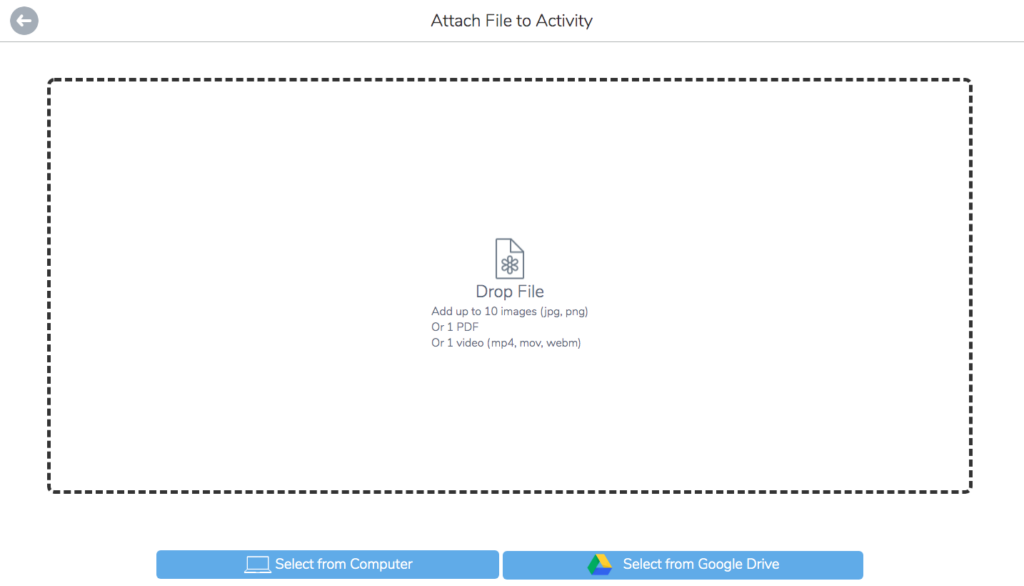
Since we took a screenshot for this example, click “Select from Computer.”
You can also drag and drop your file or Select a PDF from your Google Drive.
Click the green check.
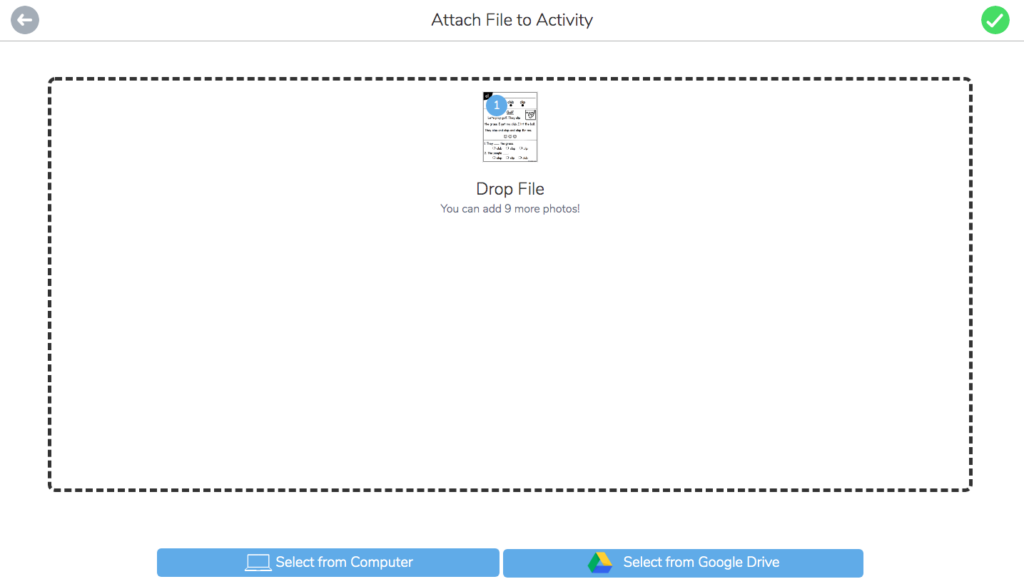
This is a preview of what your activity looks like.
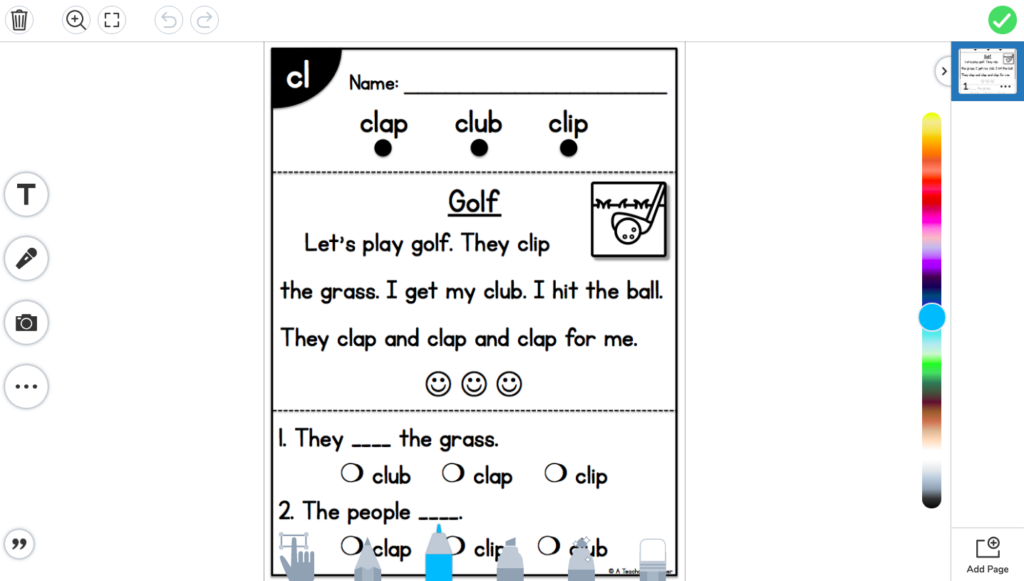
If you would like to add features, such as a text box showing students where to add text, a recording of yourself, a picture, shape, or background, use the tools on the left-hand side.
Click the green check.
Step 7: Save and Preview the Activity
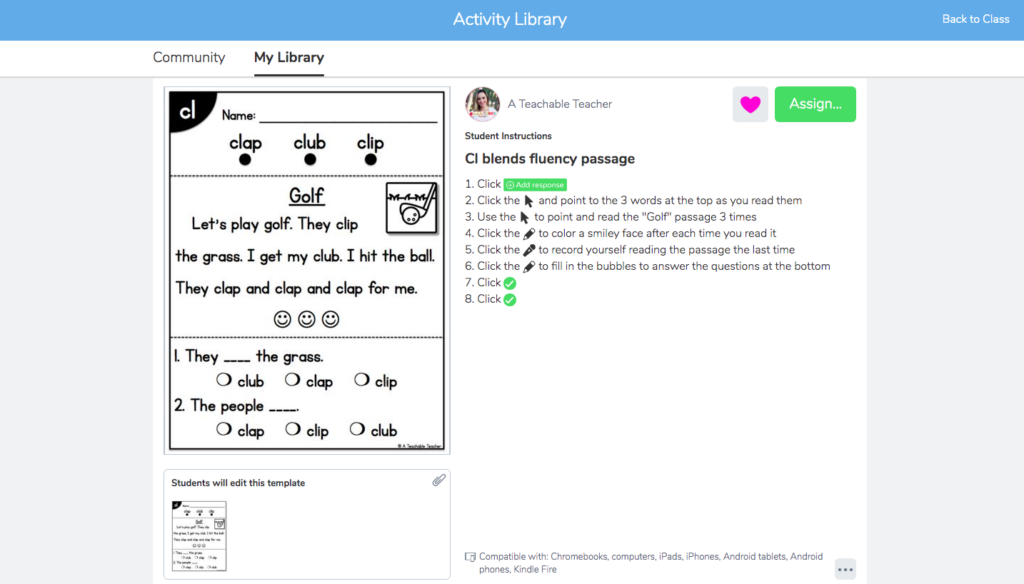
This screen shows a preview of your activity.
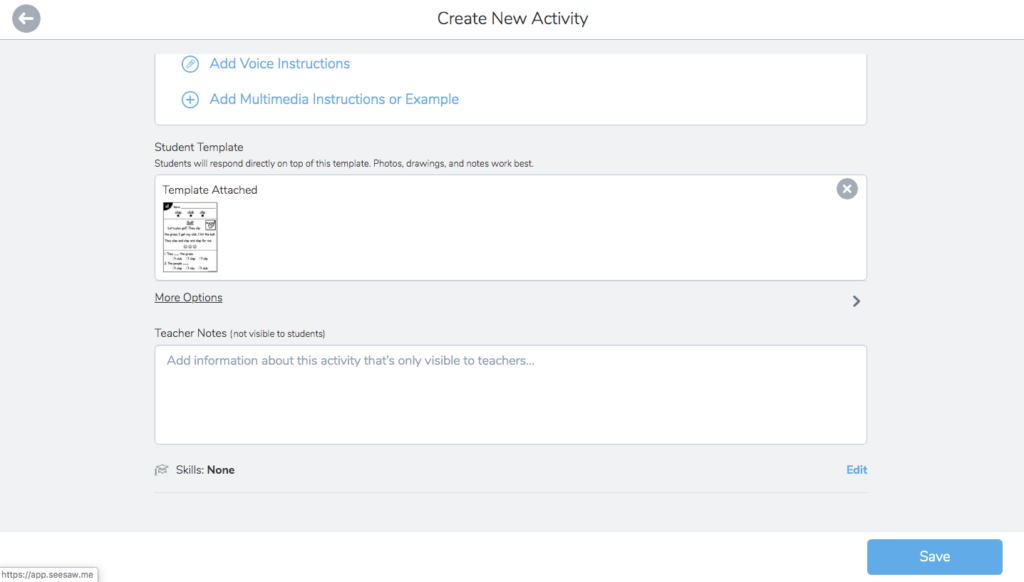
If you scroll down and click “More Options,” you can add Teacher Notes.
If you have access to premium features in Seesaw, you can also add specific skills.
Click Save when finished to view the finished product.
Step 8: Assign the Activity
To assign the activity to your students, click the green “Assign” button.
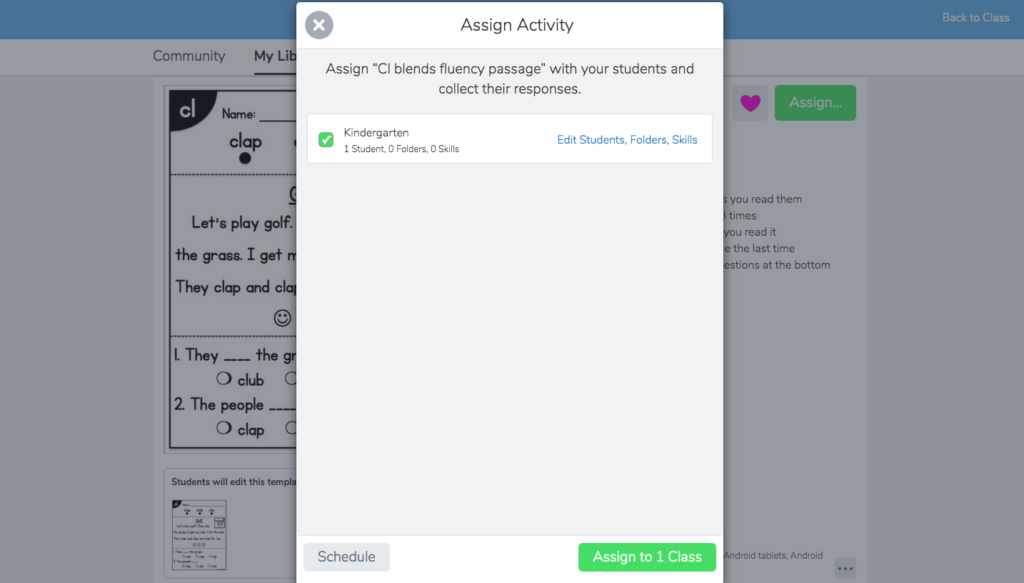
If you want to assign this activity to only a selection of students, click “Edit Students, Folders, Skills, and select those specific students.
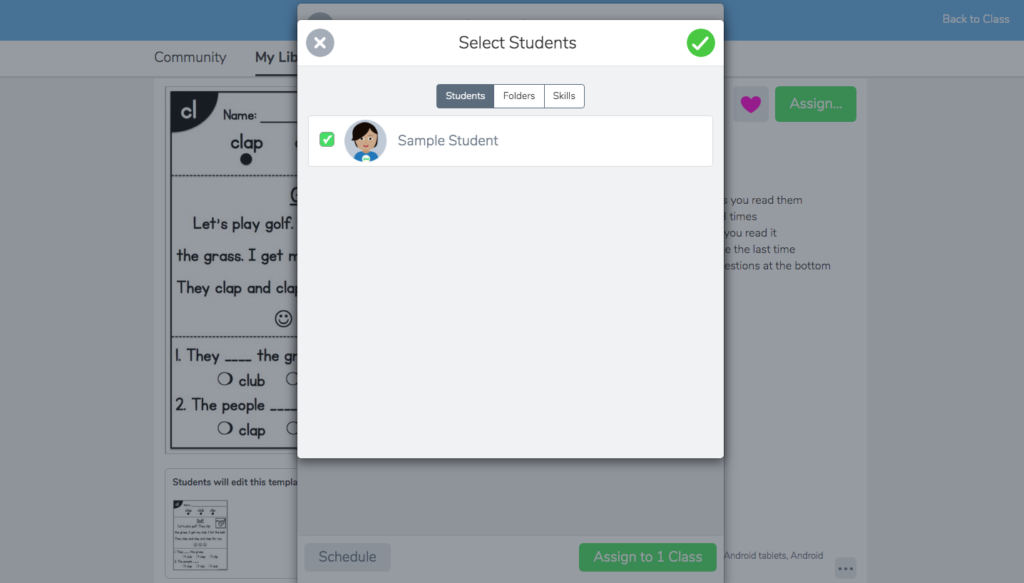
Click the green check.
If you have access to premium features in Seesaw, you may schedule activities by clicking “Schedule.”
Otherwise, click “Assign to 1 Class.”
Click “View Activity in (grade level).”
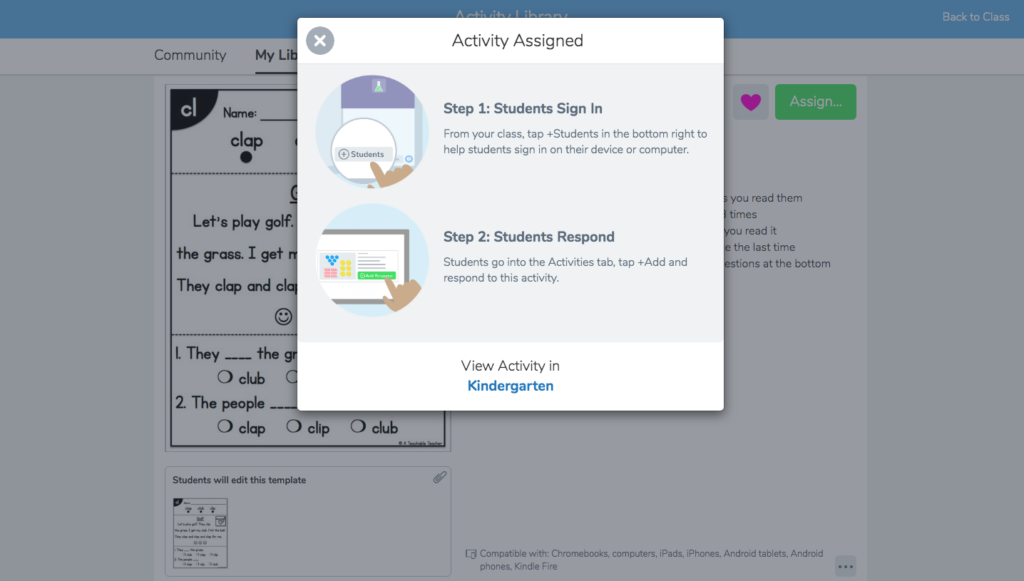
It’s official! You’re activity is ready for your students to use digitally!
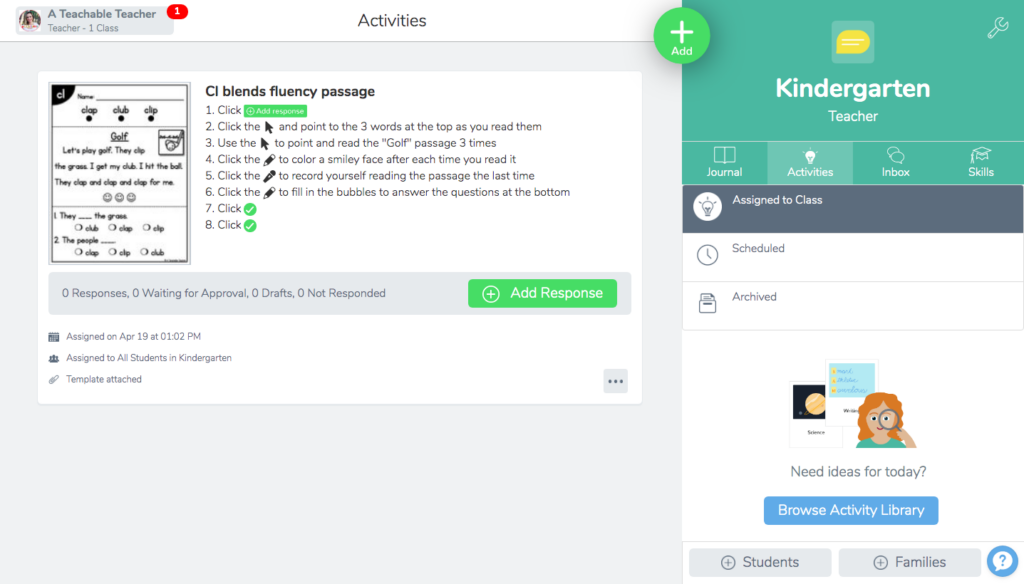
Interacting with the Resources in Seesaw
As you can see, there are so many ways for students to interact with and use resources in Seesaw. If the resources are familiar with the students, they will catch on quickly when it comes to interacting with the them.
You can get really creative, keep it super simple, or do a little bit of both.
My advice is to start simple. Then after a few activities, you may be ready to encourage the students to interact more freely with the resources to show their creativity and express their ideas.
Final Thoughts on Seesaw
What do you think? Are you ready to try using Seesaw?
Even if you’re at the end of distance learning for this school year, Seesaw is a great tool to keep in your back pocket for next year! If you feel up to it, play around with it this summer.
Whether we end up distance learning in the fall or not, there are so many ways to use and incorporate Seesaw, especially for teaching reading!
If you have any Seesaw tips or tricks to share with us, please leave them in the comments below. I can’t wait to read them!
Questions About Seesaw
Remember, I’m not a Seesaw affiliate or partner…I’m just giving you information and opinion based on my experience with the software. The Seesaw website has an awesome help section to answer your questions. You can find it here.


Thank you for sharing “How to use Seesaw” with VIDEO! That was VERY VERY helpful for a Seesaw newbie!
You are very welcome! I’m so glad it was helpful to you! =)
I only say thank you.
You are so welcome!